This guide will walk you through the creation of a basic, custom HTML email template that works with FeedOtter. This guide will focus on creating the technical elements of the data-driven email. You can apply the lessons learned here to your own HTML email creation to create custom, data-driven emails that are compatible with FeedOtter's automated and curated email features.
Like many other email softwares FeedOtter has a token or merge variable language. Using any of the following tokens in your FeedOtter HTML email will result in data being displayed in place of the token object.
There are several different kinds of tokens:
Campaign Tokens:
Used to display data related to the FeedOtter campaign object such as Send Date or Campaign Name.
Post Loop Tokens:
These are tokens that relate to your RSS content such as post title, description, url, and author.
UI Tokens:
These are special tokens that allow you to interact with the FeedOtter "edit" UI. Examples include: primary color, button color, and heading text. If you are coding an email from scratch we recommend using Custom Tokens rather than UI tokens as they offer more flexibility.
Custom Tokens:
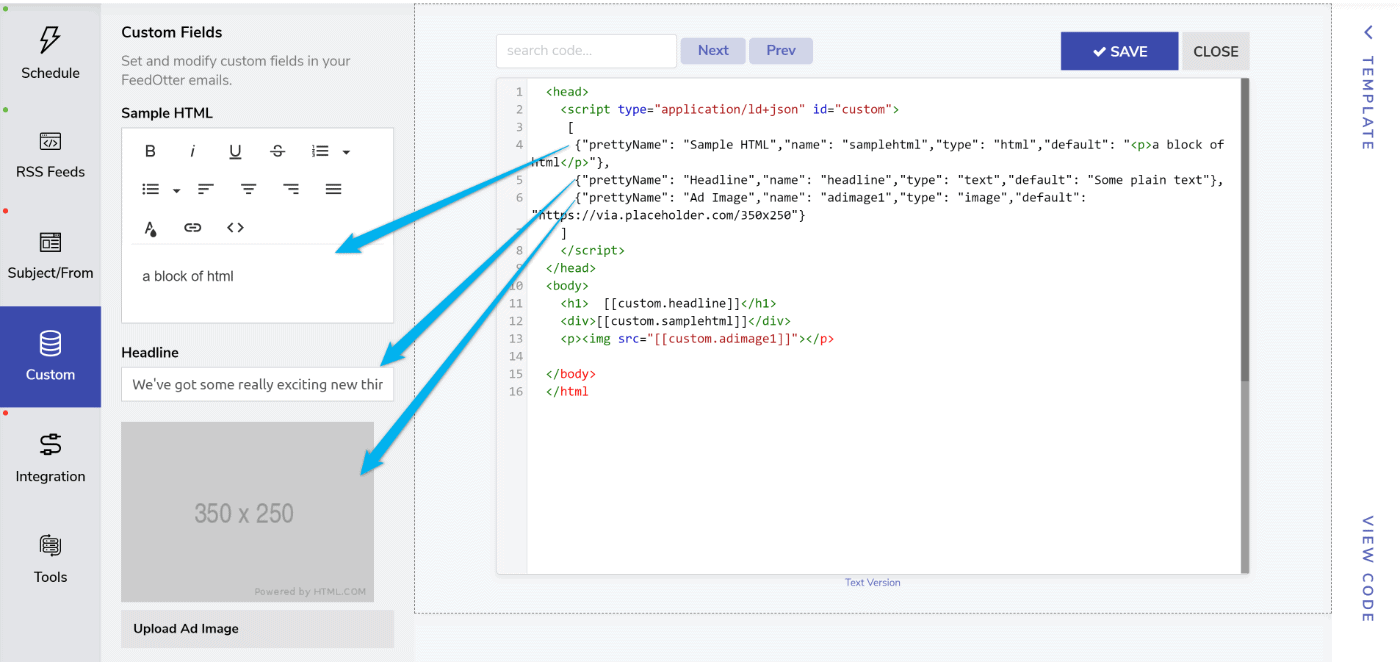
These are tokens defined in the email template file. You can create any number custom tokens to make parts of your email editing from the FeedOtter edit UI. Customers use these to allow for custom image uploads, text and headline updates and more.
Available in Curated Newsletter Builder Only.
A date object which contains the date that a curated newsletter is scheduled. This may be useful if you create newsletters that are scheduled in the future. This token REQUIRES the use of a formatter such as [[feedotter.scheduled_date | date("m/d/Y")]] Date formatters are in PHP format. See: PHP date function and PHP date generator.
The publish date of a blog post. This field can be formatted using [[post.post_date | date("F d")]] For details on how to format dates please visit: https://www.php.net/manual/en/function.date.php
These merge codes correspond to properties that can be customized from the FeedOtter Customize interface.
| Merge Code | Description |
|---|---|
| [[feedotter.primary_color]] | The color(hex) selected as primary color in the campaign wizard |
| [[feedotter.secondary_color]] | The color(hex) selected as secondary color in the campaign wizard |
| [[feedotter.button_color]] | The color(hex) for buttons and calls to action links |
| [[feedotter.footer_text_color]] | The color(hex) of text in the default footer text. Only allowed inside "footer_html" content. |
| [[feedotter.footer_html]] | WYSIWYG html block for footer content. |
| [[feedotter.social_html]] | Display custom html to display social links and icons. |
| [[feedotter.header_image_url]] | Certain templates support the upload of a header banner image |
| [[feedotter.company_logo_url]] | Certain templates support the upload of logo image. |
| [[feedotter.post_body_char_limit]] | Certain templates support the changing of the max body length via the UI |
| [[feedotter.unsubscribe_link]] | Displays the proper unsubscribe link based on your sending software |
| [[feedotter.view_as_webpage_link]] | Displays a link to view the email as a webpage based on your sending software. |
  <head>
    <script type="application/ld+json" id="custom">
	 [
      {"prettyName": "Sample HTML","name": "samplehtml","type": "html","default": "<p>a block of html</p>"},
      {"prettyName": "Headline","name": "headline","type": "text","default": "Some plain text"},
      {"prettyName": "Ad Image","name": "adimage1","type": "image","default": "https://via.placeholder.com/350x250"}
    ]
	</script>
  </head>
  <body>
    <h1>  [[custom.headline]]</h1>
    <div>[[custom.samplehtml]]</div>
    <p><img src="[[custom.adimage1]]"></p>

  </body>
  </html
Here we cover the basic elements of a FeedOtter data-driven RSS email.
The post loop is the most important component of any FeedOtter email design. The code shown here will loop through your RSS feed and display each the title, url, and description(with html stripped) for each post in your RSS feed.
    //A very basic post loop example
    [% for post in feedotter.posts %]
    	[[post.post_title]]
    	[[post.post_url]]
    	[[post.post_description_text]]
    [% endfor %]
In many cases you may want to display a specific post or posts from an RSS feed. We do this by applying a "slice" filter to the feedotter.posts element.
Example 1. Displays only the first post in the feed.
"loop through the feed, starting at post 0, and stop after 1 post"
Example 2. Displays posts 2-5 in the feed.
"loop through the feed, starting at post 1, and stop after 4 posts"
Pay special attention to the | slice(0, 1) part of the loop definition. The first number in the slice() function is the starting point so 0=first post in a feed. The second number is the length or number of posts to display or loop through.
    //Example 1.
    [% for post in feedotter.posts | slice(0,1) %]
    	### Displaying Post 1 Only ###
    	[[post.post_title]]
    	[[post.post_url]]
    	[[post.post_description_text]]
    [% endfor %]

    //Example 2.
    [% for post in feedotter.posts | slice(1,4) %]
    	### Displaying Posts 2-5 ###
    	[[post.post_title]]
    	[[post.post_url]]
    	[[post.post_description_text]]
    [% endfor %]
FeedOtter's advanced plans support combining multiple feeds into a single feed or displaying feeds in separate loops. This feature can help you consolidate data from multiple places and display content in different sections of a newsletter with ease.
Example 1.
There are two loops. The first loop displays the first post from RSS Feed 1. The second loop displays 3 posts from RSS Feed 2. The important part to note is the loop text "feedotter.posts". Adding a number to this will allow you to access the data from multiple feeds. "feedotter.posts" is always feed1 -the topmost feed shown in the UI.
Example 2.
In this example we use a special filter to combine the data from feeds 1 and 2. This filter will remove duplicates and order all posts by their published date.
     //Example 1.
     ###Display 1 post from RSS Feed 1###
     [% for post in feedotter.posts | slice(0,1) %]
          [[post.post_title]] - [[post.post_url]]
     [% endfor %]

     ###Display 3 posts from RSS Feed 2###
     [% for post in feedotter.posts2 | slice(0,3) %]
          [[post.post_title]] - [[post.post_url]]
     [% endfor %]

     //Example 2.
     ###Combined Posts From All Feeds. De-duped and sorted by Published Date###
     [% for post in feedMerge([feedotter.posts, feedotter.posts2]) %]
          [[post.post_date | date("n/j/Y")]] == [[post.post_title]]
          [[post.post_url]]
          ###
     [% endfor %]
//Truncate to 200 characters of text(200), preserve words(true), add ellipses("...")
[[post.post_excerpt_text | truncate(200,true,"...")]]


//Truncate to 450 characters of text but preserve sentences
[[post.post_excerpt_text | truncate_sentence(450)]]
[[feedotter.send_date | date("F d")]] //the date FeedOtter sent your email formatted as: October 25
//Resize the original image to 400x400px.  This ensures your image will always appear square.
[[post.post_image_url | resize(400,400)]]
FeedOtter uses the TWIG template language. As such ANY of the TWIG supported filters and formatters are available to use to manipulate data and display variations. Here we will give examples of the some commonly used formatters.
FeedOtter supports the usage of your email platform’s merge codes as well. This is useful to insert personalization (first name etc…) or other data fields from your email platform. Here are several common and useful examples.
MARKETO:
{{system.viewAsWebpageLink:default=edit me}}
{{system.unsubscribeLink}}
{{system.forwardToFriendLink:default=#}}
{{lead.First Name:default=edit me}}
Full list of Marketo merge tokens
PARDOT LEGACY:
%%unsubscribe%%
%%email_preference_center%%
Full list of Pardot Classic Variables
PARDOT 2020+:
{{Unsubscribe}}
{{View_Online}}
{{EmailPreferenceCenter}}
{{Recipient.FirstName}}
Full list of Pardot HML Variables
Certain merge codes are available for use in your subject line they are listed below.
Best Practice: Subject lines should not exceed 100 characters so we always recommend using a truncated post title.
//Insert the title of the most recent post in the subject line
[[feedotter.latest_post_title]]
[[feedotter.latest_post_title|truncate(40,true,"...")]] //truncated example

//Date examples
[[feedotter.send_date]]
[[feedotter.send_date | date("F d")]] //formatted October, 25
<a target="_blank" href="https://twitter.com/intent/tweet?text=[[post.post_title]]&url=[[post.post_url]]" style="border:none !important;margin-right:5px;">
	<img src="https://storage.googleapis.com/feedotter-com.appspot.com/social_icons/color_circle_1/twitter.png" title="Twitter" alt="Twitter" width="20" border="0" />
</a>

<a target="_blank"  href="https://www.linkedin.com/shareArticle?mini=true&url=[[post.post_url]]" style="border:none !important;margin-right:5px;">
<img src="https://storage.googleapis.com/feedotter-com.appspot.com/social_icons/color_circle_1/linkedin.png"  title="LinkedIn" alt="LinkedIn" width="20" border="0"  />
</a>

<a target="_blank"  href="https://www.facebook.com/sharer/sharer.php?u=[[post.post_url]]" style="border:none !important;margin-right:10px;">
<img src="https://storage.googleapis.com/feedotter-com.appspot.com/social_icons/color_circle_1/facebook.png"  title="Facebook" alt="Facebook" width="20" border="0" />
</a>
Here’s an example of how we implemented social sharing icons on our Almeria template.
Often it is desirable to show/hide content based on whether Tag values are present. This can be done using conditional tags. Here are some examples:
//Basic IF Statement
[% if post.image_url == true %]
<img src="[[post.image_url]]">
[% endif %]

//IF / ELSE
[% if post.image_url %]
<img src="[[post.image_url]]">
[% else %]
<img src="http://placehold.it/600x400">
[% endif %]

//Ternary IF / ELSE
[[post.image_url ? post.image_url : 'http://placehold.it/600x400']]

//Loop Based IF / ELSE
[% if feedotter.posts|length >0 %]
//display something
[% endif %]
While FeedOtter requires a valid RSS feed to supply data. We can also read additional, custom xml values. Client’s have used this to supply custom images and descriptions along with the standard RSS data fields.
This can be especially useful when building data-driven emails from job boards, news sites, and eCommerce applications.
A helpful starting point is to use the token [[ post.asArray | json_encode ]] in your loop. This will display the raw object that you can then use to access various elements using standard object / array notation as shown below.
Below is a partial RSS entry. Note the node:
<item>
<title>Beautiful Painting of saharanpur</title>
<link>
https://uat.rauantiques.com/catalog/product/view/id/102845/
</link>
...
<custom_image>
<![CDATA[
https://cdn-uat.rauantiques.com/media/catalog/product/cache/1/image/265x/9df78eab33525d08d6e5fb8d27136e95/1/_/1_30-6635_1_3.png
]]>
</custom_image>
<price cost="$179,000" age="2,000 years" condition="perfect"></price>
...
Here is how to access the custom_image property in the FeedOtter post loop:
[% for post in feedotter.posts %] //standard post loop

//the post.asArray provides direct access to any xml fields in the <item> node of the RSS feed
[[post.asArray.custom_image.value]]

[% endfor %]
You can also access attributes of custom elements such as the cost=”$179,000″. The post.asArray.price.attr contains all of the attributes on that node.
[% for post in feedotter.posts %] //standard post loop

//the post.asArray provides direct access to any xml fields in the <item> node of the RSS feed
[[post.asArray.price.attr.cost]]  // displays $179,000
[[post.AsArray.price.attr.age]] // 2,000 years
[[post.asArray.price.attr.condition]] // perfect


[% endfor %]
Applies to: Automated Emails
One of FeedOtter's most powerful features is the ability to incorporate multiple RSS feeds into a single email. Customers have used this features to automate complex multi-section emails, displaying categories of content, or content from multiple blogs or news sites in a single email.
While using multiple feeds is a more advanced use-case and requires a Plus plan or higher it can be a great way to automate more elaborate emails.
This first code sample shows how to display content from multiple feeds in an html email. Each additional feed you add to your campaign enables a new loop feedotter.posts, feedotter.posts2 and so on.
You can loop through content using and use the familiar slice() filter to access specific sections of the feed content.
Display 1 post from RSS Feed 1
[% for post in feedotter.posts | slice(0,1) %]
[[post.post_title]] - [[post.post_url]]
[% endfor %]
Display 3 posts from RSS Feed 2
[% for post in feedotter.posts2 | slice(0,3) %]
[[post.post_title]] - [[post.post_url]]
[% endfor %]
Combined Posts From All Feeds. De-duped and sorted by Published Date [% for post in feedMerge([feedotter.posts, feedotter.posts2]) %][[post.post_date | date("n/j/Y")]] == [[post.post_title]]
### [% endfor %]
[[post.post_url]]