
I’ve been testing the Pardot Handlebars Merge Field feature this week and wanted to publish my exact test steps. If you are just getting started with Pardot or curious how to use this new feature I hope this tutorial will help you understand the basics. Keep a watch out for an expanded tutorial walking you through the full process of creating an automated personalized content newsletter using Feedotter for Pardot and the new Pardot handlebars (HML) feature.
How to Create a Pardot Handlebars Email Template with Conditions in 3 Steps
Step 1: Create Four Prospect Custom Fields
The first step in creating a Pardot Handlebars email template is to create Prospect custom fields. For this example, I used four of my favorite barnyard animals:
- chicken_content
- dog_content
- fish_content
- horse_content
All of these fields are type CHECKBOX with one value ‘TRUE’ and no default value. This is important because the handlebars conditions only evaluate empty OR set. The actual value doesn’t matter and cannot be compared against at this time.

Step 2: Edit a Non-Important Prospect and Set Any Two of the New Custom Fields to TRUE
This second step is pretty self-explanatory. As shown in the image below, edit a non-important prospect and set any two of the new custom fields to TRUE.

Step 3: Create a New Email Template
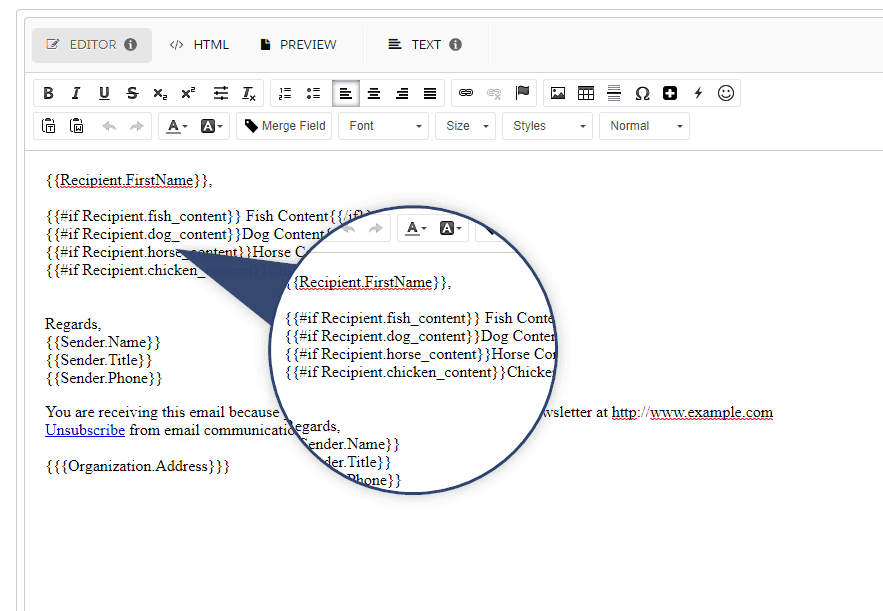
For the third and last step, create a new email template and paste in the following code:
[pastacode lang="markup" manual="%7B%7BRecipient.FirstName%7D%7D%2C%0A%0AHere%20is%20the%20content%20you%20asked%20for%20and%20nothing%20else%3A%0A%0A%7B%7B%23if%20Recipient.fish_content%7D%7D%C2%A0Fish%20Content%7B%7B%2Fif%7D%7D%0A%7B%7B%23if%20Recipient.dog_content%7D%7DDog%20Content%7B%7B%2Fif%7D%7D%0A%7B%7B%23if%20Recipient.horse_content%7D%7DHorse%20Content%7B%7B%2Fif%7D%7D%0A%0A%0A%0ARegards%2C%0A%7B%7BSender.Name%7D%7D%0A%7B%7BSender.Title%7D%7D%0A%7B%7BSender.Phone%7D%7D%0A%0AYou%20are%20receiving%20this%20email%20because%20you%20signed%20up%20to%20receive%20our%20monthly%20newsletter%20at%20http%3A%2F%2Fwww.example.com%0AUnsubscribe%20from%20email%20communications%0A%0A%7B%7B%7BOrganization.Address%7D%7D%7D" message="" highlight="" provider="manual"/]
PRESTO! Now click the preview tab and select the contact whose fields you set to TRUE in step #2. You will see that your email only shows Dog and Chicken content, not all four!

It’s Not Perfect Yet
While this Pardot Handlebars advancement is a major step forward and super-exciting there are a couple of improvements I immediately have asked for such as:
1. The ability to chain {{#if}} {{#elseif}} statements.
During testing, I wanted to create several sections of content shown only to users with matching custom field values. Because there is no way to do an ELSEIF and chain several statements together it is possible to send an email where no content is shown. An ELSEIF would allow me to create a default content area where I could display general content to those who did not match other conditions.
2. The ability to condition based on list name e.g. {{#if recipient.List.my_list_name }}
For my immediate use case, I wanted to change which content was shown based on preferences set on an email preference center page BUT preference centers only allow me to opt users into and out of lists. To get around this I created a number of Automation Rules to set and unset custom field values when a user enters or leaves a list. It was doable but a bit tedious.
3. Actual comparison
I suspect this was left out to keep things simple but adding the ability to say {{#if Recipient.dog_content = "1"}} would be nice. As it is now the IF statements only compare if the field is set IE any value will equate to TRUE and thus the content being shown. It works, you just have to set up your fields carefully with this in mind.
Important Pardot Handlebars Links:
List of all Pardot handlebars merge codes
Pardot explanation of how to use conditionals with the new handlebars tokens