
Updated September 2020
Your company’s blog—and subsequent blog subscription form—is one of the most important tools for growing your marketing database. It’s also a great way to bring visitors back to your website thereby increasing the chance they will inquire about your products or services.
In this week’s post, we’ll walk through how to create a basic blog subscription form in Pardot and add it to the sidebar of your company blog. For this how-to, you should be a Pardot user and have access to the admin area of your website/blog CMS. In this example, we will use WordPress as our CMS.
It helps to think of marketing initiatives in terms of “I Want…” phrases. They help to define a purpose and a clear goal that we hope to achieve. For this project our “I Want” phrase is going to be:
“I want to capture the email address of subscribers on the side of my company blog”
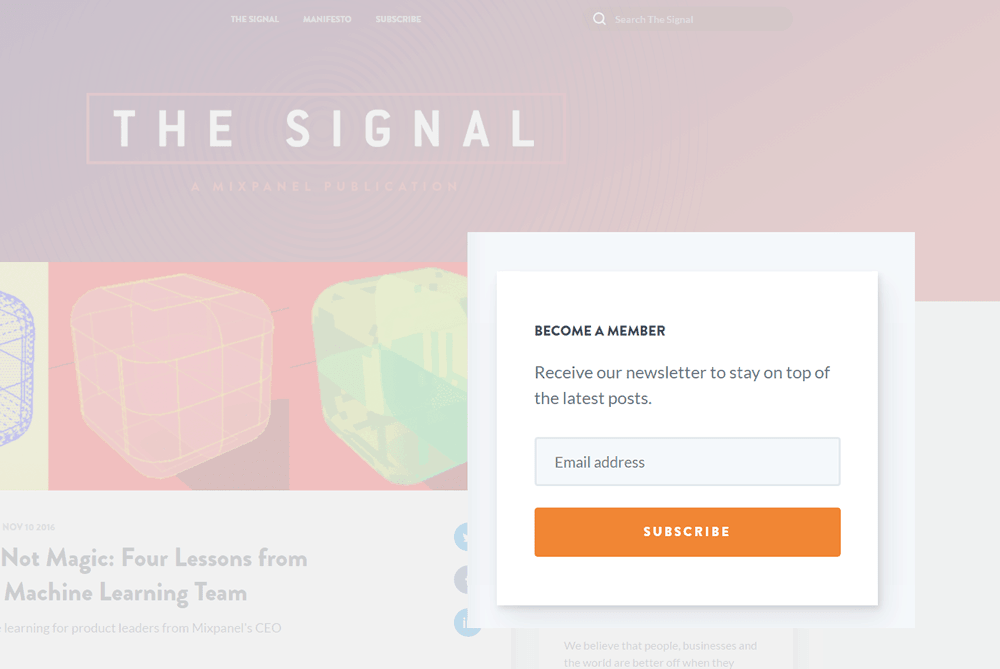
When we’re all done it will look something like this:
The Sidebar Blog Subscription Form
Here is what the finished product will look like:

Part 1. Pardot Tasks
If you haven’t already, create a new Pardot Campaign & Pardot Folder for this project. We assume the campaign and folder names from that blog post are used.
Task 1: Create a New Layout Template
In order to create a fully-custom blog subscription form in Pardot, we need to create a new layout template to reflect the visual look and feel of our form. Don’t worry—I created this for you all you need to do is copy and paste my code into the appropriate places.
- In Pardot, navigate to Landing Pages > Layout Templates
- Click the Add Layout Template button
- Name your new template LTMP -Basic Blog Sidebar Form I like to add LTMP to the beginning of my items so I always know that its a layout template. Adding “Basic” into the name will set you up for a forthcoming how-to on a more advanced form with subscription preferences built-in.
- Select your Blog Subscribers folder
- Uncheck Include default CSS stylesheet (recommended)
- Don’t click the button yet, we need to copy & paste in the blog subscriber sidebar form HTML
Now we are ready to add the custom template items.
In the Layout Tab:
- Delete everything shown in this box by default
- Copy & Paste the following code into the box
[pastacode lang=”markup” manual=”%3Chtml%3E%0A%3Chead%3E%0A%3Clink%20href%3D%22https%3A%2F%2Ffonts.googleapis.com%2Fcss%3Ffamily%3DOpen%2BSans%22%20rel%3D%22stylesheet%22%3E%0A%3Cstyle%3E%0A%20%20%20%20%23fo-subscribe%20%7B%0A%20%20%20%20%20%20%20%20padding%3A%200px%3B%0A%20%20%20%20%20%20%20%20border%3A%20none%3B%0A%20%20%20%20%20%20%20%20width%3A%2095%25%3B%0A%20%20%20%20%20%20%20%20text-align%3A%20left%3B%09%0A%20%20%20%20%20%20%20%20font-family%3A%20’Open%20Sans’%2C%20sans-serif%3B%0A%20%20%20%20%20%20%20%20color%3A%20%23868686%3B%0A%20%20%20%20%20%20%20%20font-style%3A%20normal%3B%0A%20%20%20%20%20%20%20%20font-weight%3A%20normal%3B%0A%20%20%20%20%20%20%20%20line-height%3A%201.75em%3B%0A%20%20%20%20%20%20%20%20font-size%3A%2013px%3B%0A%20%20%20%20%7D%0A%20%20%20%20%23fo-subscribe%3Eform%3Eh3%20%7B%09%09%0A%20%20%20%20%20%20%20%20font-style%3A%20normal%3B%0A%20%20%20%20%20%20%20%20font-weight%3A%20700%3B%0A%20%20%20%20%20%20%20%20line-height%3A%201.5em%3B%0A%20%20%20%20%20%20%20%20letter-spacing%3A%200.01em%3B%0A%20%20%20%20%20%20%20%20font-size%3A%2015px%20!important%3B%0A%20%20%20%20%20%20%20%20text-transform%3A%20uppercase%3B%0A%20%20%20%20%7D%0A%20%20%20%20%23fo-subscribe%3Eform%3Ep%20%7B%0A%09margin%3A0px%200px%200px%200px%3B%09%0A%20%20%20%20%20%20%20%20padding%3A%200px%200px%200px%200px%3B%09%0A%20%20%20%20%7D%0A%20%20%20%20%23fo-subscribe%3Eform%20%7B%0A%20%20%20%20%20%20%20%20width%3A%20100%25%3B%20%2F*%20100%25%20if%20using%20in%20a%20sidebar%2C%2050%25%20if%20using%20at%20the%20botom%20of%20a%20post%20*%2F%0A%20%20%20%20%20%20%20%20margin%3A%200%20auto%3B%0A%20%20%20%20%7D%0A%20%20%20%20%23fo-subscribe%3Eform%3E.fo-row%20%7B%0A%20%20%20%20%20%20%20%20text-align%3A%20left%3B%0A%20%20%20%20%20%20%20%20padding%3A8px%200%3B%0A%20%20%20%20%7D%0A%20%20%20%20%23fo-subscribe%3Eform%20input%20%7B%0A%20%20%20%20%20%20%20%20padding%3A%2012px%2015px%2012px%2015px%3B%0A%20%20%20%20%20%20%20%20width%3A100%25%3B%0A%20%20%20%20%20%20%20%20-webkit-box-sizing%3A%20border-box%3B%20%2F*%20Safari%2FChrome%2C%20other%20WebKit%20*%2F%0A%20%20%20%20%20%20%20%20-moz-box-sizing%3A%20border-box%3B%20%20%20%20%2F*%20Firefox%2C%20other%20Gecko%20*%2F%0A%20%20%20%20%20%20%20%20box-sizing%3A%20border-box%3B%20%20%20%20%20%20%20%20%20%2F*%20Opera%2FIE%208%2B%20*%2F%0A%20%20%20%20%20%20%20%20background%3A%20%23F5F5F5%20!important%3B%0A%20%20%20%20%20%20%20%20margin-bottom%3A%200%3B%0A%20%20%20%20%20%20%20%20font-family%3A%20’Raleway’%3B%0A%20%20%20%20%20%20%20%20color%3A%20%23909699%3B%0A%20%20%20%20%20%20%20%20border%3A%20solid%201px%20%23e5e5e5%3B%0A%20%20%20%20%20%20%20%20font-size%3A%2014px%3B%0A%20%20%20%20%20%20%20%20font-style%3A%20normal%3B%0A%20%20%20%20%20%20%20%20font-weight%3A%20400%3B%0A%20%20%20%20%20%20%20%20line-height%3A%2024px%3B%0A%20%20%20%20%20%20%20%20letter-spacing%3A%200px%3B%09%0A%20%20%20%20%7D%0A%20%20%20%20%23fo-subscribe%3Eform%20label.error%20%7B%0A%20%20%20%20%20%20%20%20font-size%3A%2012px%3B%0A%20%20%20%20%20%20%20%20color%3A%20%23FD8579%3B%0A%20%20%20%20%20%20%20%20display%3A%20inline-block%3B%0A%20%20%20%20%7D%0A%20%20%20%20%23fo-subscribe%3Eform%20input.error%20%7B%0A%20%20%20%20%20%20%20%20border%3A%20solid%201px%20%23FD8579%3B%0A%20%20%20%20%7D%0A%20%20%20%20%2F*%20Themes%3A%20%20%0A%20%20%20%20%0A%20%20%20%20%20%20%20%20%20%20%20%20fo-light-background-theme%3A%20use%20this%20if%20your%20site%20has%20a%20grey%20or%20non-white%20background%0A%20%20%20%20%20%20%20%20%20%20%20%20fo-dark-background-thtme%3A%20use%20this%20if%20your%20site%20has%20a%20white%20background%0A%20%20%20%20*%2F%0A%20%20%20%20%23fo-subscribe.fo-light-background-theme%20%7B%0A%20%20%20%20%20%20%20%20background-color%3A%20%23FFFFFF%3B%0A%20%20%20%20%20%20%20%20padding%3A%200px%3B%0A%20%20%20%20%7D%0A%20%20%20%20.fo-light-background-theme%3Eform%3Eh3%20%7B%0A%20%20%20%20%20%20%20%20color%3A%20%23454545%20!important%3B%0A%20%20%20%20%7D%0A%20%20%20%20.fo-light-background-theme%3Eform%3Ep%20%7B%0A%20%20%20%20%20%20%20%20color%3A%20%23868686%20!important%3B%0A%20%20%20%20%7D%0A%20%20%20%20%23fo-subscribe.fo-dark-background-theme%20%7B%0A%20%20%20%20%20%20%20%20background-color%3A%20%23E7E7E7%3B%0A%20%20%20%20%20%20%20%20color%3A%20%23666666%20!important%3B%0A%20%20%20%20%20%20%20%20border%3A%201px%20solid%20%23CCCCCC%3B%0A%20%20%20%20%20%20%20%20padding%3A%2010px%3B%0A%20%20%20%20%20%20%20%20width%3A%2090%25%3B%0A%20%20%20%20%7D%0A%20%20%20%20.fo-dark-background-theme%3Eform%3Eh3%20%7B%0A%20%20%20%20%20%20%20%20color%3A%20%23025d98%20!important%3B%0A%20%20%20%20%7D%0A%20%20%20%20.fo-dark-background-theme%3Eform%3Ep%20%7B%0A%20%20%20%20%20%20%20%20color%3A%20%23666666%20!important%3B%0A%20%20%20%20%7D%0A%20%20%20%20%2F*%20subscribe%20button%20color%20*%2F%0A%20%20%20%20%23fo-subscribe%20input%5Btype%3D%22submit%22%5D.fo-btn-subscribe%20%7B%0A%20%20%20%20%20%20%20%20background%3A%20%232980b9%20!important%3B%20%2F*%20change%20button%20background%20color%20here%20*%2F%0A%20%20%20%20%20%20%20%20color%3A%23FFF%3B%09%09%09%2F*%20change%20button%20text%20color%20here%20*%2F%0A%20%20%20%20%20%20%20%20margin-bottom%3A30px%3B%0A%20%20%20%20%20%20%20%20border%3Anone%3B%0A%20%20%20%20%20%20%20%20font-family%3A%20’Open%20Sans’%2C%20sans-serif%3B%09%0A%20%20%20%20%20%20%20%20cursor%3A%20pointer%3B%0A%20%20%20%20%20%20%20%20width%3A%20100%25%3B%0A%20%20%20%20%20%20%20%20font-style%3A%20normal%3B%0A%20%20%20%20%20%20%20%20font-weight%3A%20800%3B%0A%20%20%20%20%20%20%20%20text-transform%3A%20uppercase%3B%0A%20%20%20%20%20%20%20%20line-height%3A%2022px%3B%0A%20%20%20%20%20%20%20%20letter-spacing%3A%202px%3B%0A%20%20%20%20%20%20%20%20font-size%3A13px%3B%09%0A%20%20%20%20%20%20%20%20display%3A%20inline-block%3B%0A%20%20%20%20%7D%0A%20%20%20%20input%5Btype%3D%22submit%22%5D.fo-btn-subscribe%3Ahover%20%7B%20%20%20%20%0A%20%20%20%20%20%20%20%20opacity%3A%200.8%3B%09%0A%20%20%20%20%7D%0A%3C%2Fstyle%3E%20%20%20%20%20%20%20%0A%3C%2Fhead%3E%0A%3Cbody%20style%3D%22margin%3A0px%20!important%3B%22%3E%0A%0A%0A%20%20%20%20%3C!–%20start%20content%20–%3E%0A%0A%20%20%20%20%3Cdiv%20class%3D%22fo-light-background-theme%22%20id%3D%22fo-subscribe%22%3E%0A%20%20%20%20%20%20%20%0A%20%20%20%20%20%20%20%20%0A%20%20%20%20%20%20%20%20%25%25content%25%25%0A%20%20%20%20%20%20%20%20%0A%20%20%20%20%3C%2Fdiv%3E%0A%0A%20%20%20%20%3C!–%20end%20content%20–%3E%0A%20%20%20%20%0A%20%20%20%20%3C%2Fbody%3E%0A%20%20%20%20%3C%2Fhtml%3E” message=”” highlight=”” provider=”manual”/]
In the Form Tab:
- Delete everything shown in this box by default
- Copy & Paste the following code into the Form box
[pastacode lang=”markup” manual=”%20%20%25%25form-opening-general-content%25%25%0A%3Cform%20accept-charset%3D%22UTF-8%22%20method%3D%22post%22%20action%3D%22%25%25form-action-url%25%25%22%20class%3D%22form%22%20id%3D%22pardot-form%22%3E%0A%0A%25%25form-if-thank-you%25%25%0A%09%25%25form-javascript-focus%25%25%0A%09%25%25form-thank-you-content%25%25%0A%09%25%25form-thank-you-code%25%25%0A%25%25form-end-if-thank-you%25%25%0A%0A%25%25form-if-display-form%25%25%0A%0A%09%25%25form-before-form-content%25%25%0A%09%09%0A%09%09%25%25form-start-loop-fields%25%25%0A%09%09%20%3Cdiv%20class%3D%22fo-row%22%3E%0A%20%20%20%20%20%20%20%20%20%20%20%20%20%20%20%20%09%25%25form-if-field-label%25%25%0A%20%20%20%20%20%20%20%20%20%20%20%20%20%20%20%20%09%20%20%20%20%3Clabel%20class%3D%22field-label%22%20for%3D%22%25%25form-field-id%25%25%22%3E%25%25form-field-label%25%25%3C%2Flabel%3E%0A%20%20%20%20%20%20%20%20%20%20%20%20%20%20%20%20%09%25%25form-end-if-field-label%25%25%0A%20%20%20%20%20%20%20%20%20%20%20%20%20%20%20%20%09%0A%20%20%20%20%20%20%20%20%20%20%20%20%20%20%20%20%25%25form-field-input%25%25%0A%20%20%20%20%20%20%20%20%20%20%20%20%20%20%20%20%3C!–%3Cinput%20type%3D%22email%22%20name%3D%22email%22%20class%3D%22form-control%22%20required%3D%22%22%20aria-required%3D%22true%22%3E–%3E%0A%20%20%20%20%20%20%20%20%20%20%20%20%20%20%20%20%0A%20%20%20%20%20%20%20%20%20%20%20%20%20%20%20%20%0A%20%20%20%20%20%20%20%20%20%20%20%20%20%20%20%20%09%0A%20%20%20%20%20%20%20%20%20%20%20%20%20%20%20%20%09%3Cdiv%20id%3D%22error_for_%25%25form-field-id%25%25%22%20style%3D%22display%3Anone%22%3E%3C%2Fdiv%3E%0A%09%09%09%25%25form-field-if-error%25%25%0A%09%09%09%09%3Clabel%20class%3D%22error%20no-label%22%3E%25%25form-field-error-message%25%25%3C%2Flabel%3E%0A%09%09%09%25%25form-field-end-if-error%25%25%0A%20%20%20%20%20%20%20%20%20%20%20%20%20%20%20%20%09%0A%20%20%20%20%20%20%20%20%20%20%20%20%3C%2Fdiv%3E%20%0A%09%09%0A%09%09%25%25form-end-loop-fields%25%25%0A%09%09%0A%09%09%25%25form-spam-trap-field%25%25%0A%09%09%0A%09%09%3C!–%20forces%20IE5-8%20to%20correctly%20submit%20UTF8%20content%20%20–%3E%0A%09%09%3Cinput%20name%3D%22_utf8%22%20type%3D%22hidden%22%20value%3D%22%26%239731%3B%22%20%2F%3E%0A%09%09%0A%09%09%3Cp%20class%3D%22submit%22%3E%0A%09%09%20%20%20%20%3Cinput%20type%3D%22submit%22%20accesskey%3D%22s%22%20value%3D%22%25%25form-submit-button-text%25%25%22%20%25%25form-submit-disabled%25%25%20class%3D%22fo-btn-subscribe%22%3E%20%0A%09%09%3C%2Fp%3E%0A%09%09%0A%09%25%25form-after-form-content%25%25%0A%09%0A%25%25form-end-if-display-form%25%25%0A%0A%25%25form-javascript-link-target-top%25%25%0A%3C%2Fform%3E” message=”” highlight=”” provider=”manual”/]
Again, make sure the Include default CSS stylesheet (recommended) checkbox is Unchecked
Click the Create layout template button
Task 2: Create a New Pardot Blog Subscription Form
- In Pardot, navigate to Marketing > Forms > New Form
- Name your form FRM – Basic Blog Sidebar Form
- Fill out the remaining fields
- Click Next
The following page will allow us to configure:
- What fields we collect from a blog subscription form (email)
- The text we show at the top of our form
- What the visitor sees when they successfully submit
- Completion Actions that we want to associate
Let’s get started!
- In the Fields section, remove all fields until Email is the only one left.
- Click Next
- In the Look and Feel section:
- Select the Layout Template we just created LTMP – Basic Blog Sidebar Form
- Enter the Submit Button Text “SUBSCRIBE”
- Enter the following text in the Above Form box
- “DON’T MISS A POST” – from the Format dropdown make this phrase Heading 3
- “Subscribe to receive an email when we publish new content.” – from the Format dropdown make this phrase Normal
- Should look like the image below:
- Click Next
In the Completion Actions section enter the phrase “Thank You For Subscribing” for the Thank You Content. This is what will be shown to your visitors after they fill out the form.
I have also created a Completion Action which will add everyone who fills out this form onto a Pardot List called LST – Basic Blog Subscribers. I will use this list as the basis for an email newsletter full of blog posts using Feedotter.
- Click Next
- Review all settings and click the Confirm & Save button
Alright, we’re ready to add our new form to our blog.
- From the Form saved successfully page click the dropdown in the upper-right and select View HTML code
- Copy the <iframe> code block and get ready to add this to your website.
- Tip: You may want to change the <iframe> height attribute to 300. That will be more than enough for this form.
Part 2. Embed the Blog Subscription Form on Your Company Blog
I wrote this form to be as flexible as possible but there is no way to predict how it will look 100%. Overall, it should look great with no tweaking.
For this example, we are using WordPress as our blog’s CMS (content management system). If you use a different CMS you will need to paste your HTML code wherever you modify your blog’s sidebar. This form is specifically designed for a sidebar (right or left) where the width is around 300px so that is where we will put it.
For WordPress Users:
Login to your WordPress Admin and navigate the side menu to Appearance > Widgets. Everyone’s Widgets area will look slightly different depending on the Theme you are using but you should be able to identify a Widget that corresponds to the sidebar of your blog. On the Feedotter blog, it is conveniently named “Blog Widgets.”
From the Available Widgets area drag a new Text widget into the sidebar widget area and expand it. This is where you will paste in the HTML content.
Click the Save button and that’s it! At this point, you can head to your blog and see how your blog subscription form turned out.
Troubleshooting
If your blog subscription form doesn’t show up, check to see if your website is using HTTPS. If it is, you will need to make a small change to the <iframe> HTML embed code you got from Pardot to make the blog subscription form work. Go back into WordPress > Widgets and edit your iframe code, change http:// to https://.
Other problems or ideas for blog subscription forms in Pardot? Share your suggestions in the comments below!