The Pardot Engagement Studio makes email marketing automation a breeze—if you know how to take advantage of all of its features. The Pardot Engagement Studio allows you to visualize all of your drip email campaigns. A drip campaign is like an irrigation system for your email-generated leads. A pool of leads trickles down a system of gated canals that open or stay closed depending on prospects’ actions and characteristics.
Pardot allows you to establish three important things to understand first before diving into Pardot Engagement Studio: actions, triggers, and rules. Fortunately, while there is a learning curve, it all makes sense once you start putting automation into practice.
Actions
In Pardot Engagement Studio, actions are tasks the program performs on your behalf. The actions you can initiate are:
- Add/Remove to list. Add/Remove prospects to the list of your choosing, including different recipient lists within your drip campaign.
- *Add to Salesforce campaign. Assign a prospect and their respective score to a specific Salesforce campaign.
- Adjust score. Raise or lower prospects’ scores.
- Apply/Remove tags. Assign/Remove tags to certain prospects.
- Assign to group. Put prospects in specified user groups.
- Assign to user. Assign prospects to other Engagement Studio users on your account.
- *Assign to Salesforce active assignment rule. Convert a prospect to a lead and move them into Salesforce using a pre-made assignment rule.
- *Create Salesforce task. Design and assign Salesforce tasks.
- Change prospect field view. Remove or alter a prospect’s internal field view.
- Notify user. Send Engagement Studio users notifications when a prospect performs certain actions.
- Remove from list. Remove prospects from lists of your choosing.
- Send email. Send certain prospects designated email templates.
All the actions Pardot offers give you full control of prospect organization, interaction, and user assignment. Design your actions thoughtfully for effective and low-maintenance email automation.
*Requires a Salesforce connector.
Timing Your Actions
When it comes to timing your actions, you have two choices for when Pardot will initiate actions after a prospect reaches a certain step on your drip campaign’s pathway:
- Immediately: The program will initiate the designated action as soon as a prospect hits the step.
- Wait: Pardot will delay a certain amount of time (specified by you) before performing the action. This is often determined by the rules and triggers set.

Triggers
Triggers are actions performed by email recipients that initiate certain steps along the path of your drip campaign. They’re like gatekeepers along the route your email prospects take from initial contact to (hopeful) conversion.
The Pardot Engagement Studio triggers include:
- Email open. Monitors for HTML email openings.
- Email link click. Watches for recipients clicking on any or specified links in the emails you send.
- Form. Activated when a prospect opens and/or fills out forms of your choosing.
- Landing page. Monitors for successful landing page visits via emails you send.
- Custom redirect click. Initiated by clicks on custom redirect links in your emails.
- File download. Triggered by non-image downloads of Pardot content files.
Deciding which triggers to use and where to place them along the path is a crucial component of your drip campaign. Certain triggers should only initiate certain follow-up emails and/or actions. For example, if a recipient hits the “Form” trigger by opening a form, you’d want to follow up with an email encouraging the recipient to return to and complete that form. When your emails are targeted and specific, there’s a greater likelihood of conversion.
Timing Your Triggers
You can choose how long Pardot Engagement Studio waits to assess triggers with the following timing options:
- Wait up to a maximum of. The program looks for triggers for a maximum amount of time (set by you) once a recipient has reached a specific step in your drip campaign.
- Wait. Pardot will keep prospects at a trigger for the amount of time you choose before moving them onto the next step.
Rules
Pardot rules are what govern which paths email recipients will take. They are like the different branches of an irrigation system; depending on factors like grade, user assignment, and campaign, recipients will trickle down your drip campaign by way of the most promising routes you design for varied scenarios.
The rules you can choose include:
- Assigned Salesforce queue. Design a path based on which Salesforce queue where a prospect resides.
- Assigned user. Designate paths based on which Pardot Engagement Studio user prospects are assigned to.
- Assignment status. Choose paths dependent on whether a prospect has been assigned or not.
- Grade. Create paths based on prospects’ grades.
- List. Choose paths based on the list(s) a prospect is on.
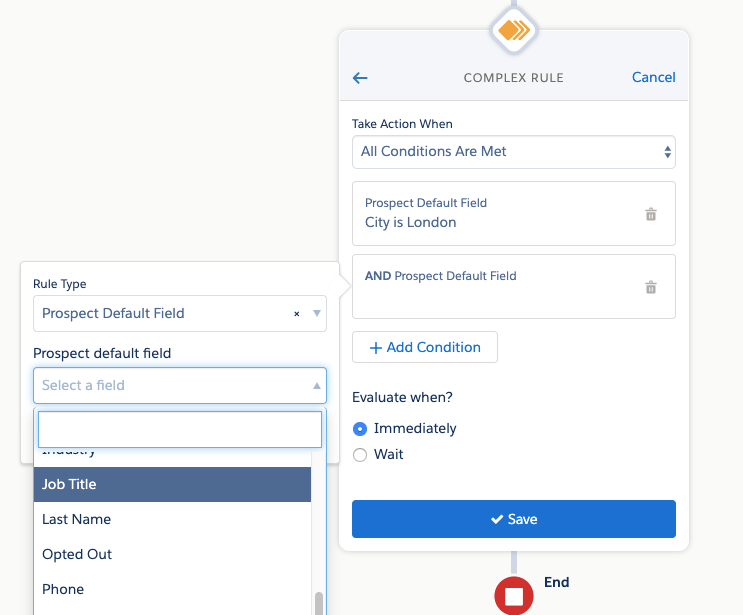
- Prospect custom/default field. Designate pathways based on a prospect’s custom/default field value.
- Score. Make paths based on prospects’ scores.
- Prospect tag. Allow entrance to different pathways by way of specific prospect tags.
- Salesforce campaign. Design paths based on prospects’ Salesforce Campaign membership. You can also create paths based on their Salesforce Campaign status.
- Prospect email status. Designate pathways based on whether a recipient has opted in/out of emails from you.
- Pardot campaign. Design paths for prospects with Pardot Campaign memberships.
- Salesforce status. Make pathways based on whether a prospect is a lead, contact, or deleted.
Not all paths are created equal—and for good reason! Your recipients form a mixed bag and each pathway requires specific actions, triggers, and email templates to best suit their varying needs. Defining and creating different rules will help you organize your drip campaign and strategize the best email marketing tactics for the wide array of recipients you contact.
Timing of Rules
You can decide when rules are put into action by choosing between the following rules timing options:
- Immediately. A rule is enforced as soon as a prospect lands on a certain step.
- Wait. You set a time period the program must wait before enforcing a rule when a prospect has reached a certain step.
Once you have your parameters for actions, rules, and triggers in place, you should always run a test to ensure the paths you’ve created are effective and work properly. Pardot Engagement Studio offers testing so you can go through your entire drip campaign from start to finish and verify everything works as you’d expect.
Using Pardot Engagement Studio for Drip Campaign Visualization
Once you’re set to go, visit Marketing > Engagement Studio in Pardot and click on the Drip campaign you want to visualize. Learn how to include your campaign in Pardot Engagement Studio here.
Being able to see where your users are going is extremely important when thinking big picture, but the real value is being able to drill down into your reporting while still keeping this visualization happening. This makes it much easier to keep track of what you want to edit and why, saving you time sifting through multiple campaigns and multiple emails within those multiple campaigns.
Reporting
Once your drip campaign is up and running, you’ll need to monitor how well it’s working. Pardot Engagement Studio offers the following to help you track the effectiveness of your pathways:
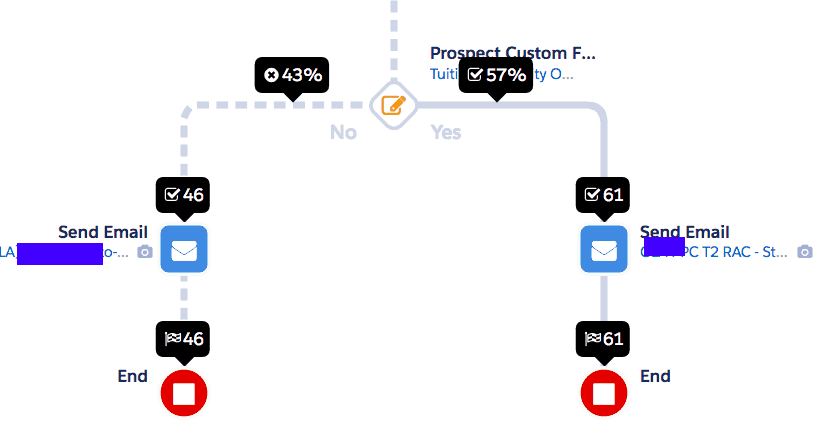
- Tooltips. This is a more general, high-level analysis of your overall campaign. You’ll be able to see how many prospects have completed a step along with your drip campaign and how those prospects are divided (via percentages) along the different branches of your campaign pathway.
- Report Card. You can click on an individual step for a more in-depth look at how prospects interacted with specific aspects of your drip campaign. This report will give you an idea of which actions, rules, and triggers may need adjusting.
As you can see in the screenshot below, it’s as easy as hovering over a campaign in the Pardot Engagement Studio to see your reports by clicking on the links. This helps keep the visualization a part of your decision making so that you don’t have to sift through all of your campaigns and each email within each campaign to see the information you need to see. You can even click the camera icon to see a photo of the email.
As your company scales, this will be extremely important (trust us!).

Tips and Best Practices for Pardot Engagement Studio
Now you have a general idea of how Pardot Engagement Studios helps you visualize and organize drip email campaigns. However, as you go along, don’t forget these tips and best practices for a smooth email automation experience:
- Keep your drip campaigns to under 30 steps.
- If you remove a prospect from a list in your drip campaign, they will stop moving along the pathway in which their respective list applied and resume where they were originally removed if you decide to add them back to the list.
- You can send a succession of emails (via “send emails” action) without using triggers or rules to govern their initiation.
- When a prospect opts out of a certain email list, they’ll still continue on the designated path (but won’t receive subsequent emails). If the prospect is on multiple lists and only opts out of one, they’ll continue to go along the paths and receive emails related to the lists they haven’t opted out of.
- You can add prospects to a drip campaign at any time (regardless of where other prospects are on the path). However, they will always start at the beginning of the pathway.
- You can add new emails to your drip campaign at any time; only prospects who haven’t yet reached the action with the new email design will receive the updated version.
- Standard Pardot accounts are allowed up to 20 email drip campaigns; Pro and Ultimate account holders can make up to 50.
For a successful email drip campaign, you’ll need to put a good amount of time into deciding what your rules, actions, and triggers will be. Once everything’s set up, you’ll still need to tinker with your settings and designs but Pardot Engagement Studio should be able to do most of the heavy lifting for you. Now, go forth and automate some emails!

