Personalizing your emails can be a great way to engage and connect with your subscribers.
By dynamically inserting subscriber-specific information, like names, job titles, or recent interactions, you can use personalization tokens to transform generic newsletters into highly targeted communications that engage and convert.
Today, we’re taking a look at which tokens are available to Pardot users—and how to effectively use these tokens to create compelling, customized email experiences that resonate with your audience and boost campaign performance.
Read more: Content personalization tips for B2B marketing
Pardot personalization tokens are more than just placeholders for basic details like first names—they allow you to incorporate a wide range of data points.
From account-level information such as company size or industry to behavioral data like product interests or recent downloads, tokens enable deep customization across your email content.
The key to maximizing the impact of personalization efforts lies in selecting the most relevant data fields for your audience and integrating them into your messaging.
In the next sections, we’ll walk through the types of personalization tokens available in Pardot and how to use them to drive engagement and conversions.
NOTE: All Pardot personalization tokens are in Handlebar Merge Token format. The Pardot Legacy tokens are listed at the bottom of this guide, or you can find the full list here.
These are the most commonly used tokens we see in our FeedOtter emails for Pardot that are the perfect way to add some customization and uniqueness to your emails.
| HANDLEBARS MERGE FIELD | DATA THE FIELD DISPLAYS |
|---|---|
| {{Subject}} | The email’s subject |
| {{Unsubscribe}} | Link to Pardot’s default unsubscribe page |
| {{Resubscribe}} | Link to Pardot’s default resubscribe page. |
| {{AddThis_URL_Email}} | Link to share via email |
| {{AddThis_URL_Facebook}} | Link to share via Facebook post |
| {{AddThis_URL_Linkedin}} | Link to share via LinkedIn |
| {{AddThis_URL_More}} | Link to share on other social media sites |
| {{Addthis_URL_Twitter}} | Link to share via Twitter |
| {{View_Online}} | Link to view an email in a web browser |
| {{EmailPreferenceCenter}} | Link to Pardot’s default Email Preference Center page |
| {{Current_Day}} | The day the email is sent formatted as DD |
| {{Current_Month}} | The month the email is sent formatted as MM |
| {{Current_Year}} | The year the email is sent formatted as YYYY |
You can also add a custom email preference center to your emails for more personalization.
Account tokens refer to your prospect’s account information more specifically related to their company details. You can use these fields for confirmation or outreach emails and internal emails to your team. Here’s the full list from Pardot of Account tokens:
| HANDLEBARS MERGE FIELD | DATA THE FIELD DISPLAYS |
|---|---|
| {{{Organization.Address}}} | Your Pardot account’s address. Admins can update this address in by editing account settings. |
| {{Recipient.Account.AccountNumber}} | Prospect account’s number field |
| {{Recipient.Account.AnnualRevenue}} | Prospect account’s Annual Revenue field |
| {{Recipient.Account.BillingCity}} | Prospect account’s Billing City field |
| {{Recipient.Account.BillingCountry}} | Prospect account’s Billing Country field |
| {{Recipient.Account.BillingPostalCode}} | Prospect account’s Billing Zip field |
| {{Recipient.Account.BillingState}} | Prospect account’s Billing State field |
| {{Recipient.Account.BillingStreet}} | Prospect account’s Billing Address One and Two fields |
| {{Recipient.Account.Fax}} | Prospect account’s Fax field |
| {{Recipient.Account.Industry}} | Prospect account’s Industry field |
| {{Recipient.Account.Name}} | Prospect account’s Name field |
| {{Recipient.Account.NumberOfEmployees}} | Prospect account’s Number of Employees fields |
| {{Recipient.Account.Ownership}} | Prospect account’s Ownership field |
| {{Recipient.Account.Phone}} | Prospect account’s Phone field |
| {{Recipient.Account.Rating}} | Prospect account’s Rating field |
| {{Recipient.Account.ShippingCity}} | Prospect account’s Shipping City field |
| {{Recipient.Account.ShippingCountry}} | Prospect account’s Shipping Country field |
| {{Recipient.Account.ShippingState}} | Prospect account’s Shipping State field |
| {{Recipient.Account.ShippingStreet}} | Prospect account’s Shipping Address One and Two fields |
| {{Recipient.Account.Sic}} | Prospect account’s SIC Code field |
| {{Recipient.Account.Site}} | Prospect account’s Site field |
| {{Recipient.Account.TickerSymbol}} | Prospect account’s Ticker Symbol field |
| {{Recipient.Account.Type}} | Prospect account’s Type field |
| {{Recipient.Account.Website}} | Prospect account’s Website field |
| {{Recipient.Account.<custom_field_api_name>}} | Custom field from the prospect’s account |
These recipient tokens are specifically related to the subscriber receiving your FeedOtter email. You can use these tokens to add name to your greeting, their job title, and more personalized information anywhere in your email.
| HANDLEBARS MERGE FIELD | DATA THE FIELD DISPLAYS |
|---|---|
| {{Recipient.City}} | Prospect’s City field |
| {{Recipient.Comments}} | Prospect’s Comments field |
| {{Recipient.Company}} | Prospect’s Company field |
| {{Recipient.Country}} | Prospect’s Country field |
| {{Recipient.Department}} | Prospect’s Department field |
| {{Recipient.Email}} | Prospect’s Email field |
| {{Recipient.Fax}} | Prospect’s Fax field |
| {{Recipient.FirstName}} | Prospect’s First Name field |
| {{Recipient.ID}} | Prospect’s lead or contact CRM ID |
| {{Recipient.Industry}} | Prospect’s Industry field |
| {{Recipient.LastName}} | Prospect’s Last Name field |
| {{Recipient.NumberOfEmployees}} | Prospect’s Employees field |
| {{Recipient.Owner.Email}} | Assigned user’s Email Address field |
| {{Recipient.Owner.FirstName}} | Assigned user’s First Name field |
| {{Recipient.Owner.LastName}} | Assigned user’s Last Name field |
| {{Recipient.Owner.Name}} | Assigned user’s name; displayed as: First_Name Last_Name |
| {{Recipient.Owner.Phone}} | Assigned user’s Phone Number field |
| {{Recipient.OwnerId}} | Assigned user’s CRM ID |
| {{Recipient.Phone}} | Prospect’s Phone field |
| {{Recipient.PostalCode}} | Prospect’s Zip field |
| {{Recipient.Salutation}} | Prospect’s Salutation field |
| {{Recipient.State}} | Prospect’s State field |
| {{Recipient.Street}} | Prospect’s Address One and Two fields |
| {{Recipient.Territory}} | Recipient’s Territory field |
| {{Recipient.Title}} | Prospect’s Job Title field |
| {{Recipient.Website}} | Prospect’s Website field |
| {{Recipient.YearsInBusiness}} | Prospect’s Years In Business field |
| {{Recipient.<custom_field_api_name>}} | Custom field from the prospect’s record |
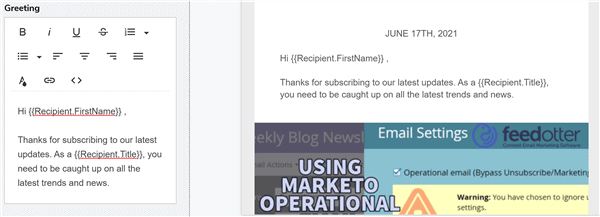
Here’s an example for using some Pardot personalization from the recipient of the email:

These Sender tokens are a great way to personalize your emails by providing information about the person on your team sending the emails. From name, to phone number, to job title, so the recipient can feel a more personal connection with your company.
| HANDLEBARS MERGE FIELD | DATA THE FIELD DISPLAYS |
|---|---|
| {{Sender.Email}} | The sending user’s Email field |
| {{Sender.FirstName}} | The sending user’s First Name field |
| {{Sender.LastName}} | The sending user’s Last Name field |
| {{Sender.Name}} | The sending user’s full name; displayed as: First_Name Last_Name |
| {{Sender.Phone}} | The sending user’s phone number |
| {{Sender.Signature}} | The sending user’s text signature, available to edit in the user’s profile |
| {{Sender.Title}} | The sending user’s job title |
| {{Sender.URL}} | Link to your company’s website from assigned user’s URL field |
If you still have PML enabled on your account, you will need to use these common personalization tokens instead:
| VARIABLE TAG | DATA THE TAG DISPLAYS |
|---|---|
| %%account_address%% | Your Pardot account’s address. Admins can update this address in by editing account settings. |
| %%address_one%% | Prospect’s Address One field |
| %%address_two%% | Prospect’s Address Two field |
| %%addthis_url_email%% | Link to share via email |
| %%addthis_url_facebook%% | Link to share via Facebook post |
| %%addthis_url_linkedin%% | Link to share via LinkedIn |
| %%addthis_url_more%% | Link to share on other social media sites |
| %%addthis_url_twitter%% | Link to share via Twitter |
| %%annual_revenue%% | Prospect’s Annual Revenue field |
| %%assigned_user.name%% | Assigned user’s name; displayed as first_name last_name |
| %%assigned_user.first_name%% | Assigned user’s first name |
| %%assigned_user.last_name%% | Assigned user’s last name |
| %%assigned_user.phone%% | Assigned user’s phone number |
| %%assigned_user.email%% | Assigned user’s email address |
| %%city%% | Prospect’s City field |
| %%comments%% | Prospect’s Comments field |
| %%company%% | Prospect’s Company field |
| %%country%% | Prospect’s Country field |
| %%crm_id%% | Prospect’s Lead or Contact CRM ID |
| %%department%% | Prospect’s Department field |
| %%email%% | Prospect’s Email field |
| %%email_preference_center%% | Link to Pardot’s default Email Preference Center page |
| %%fax%% | Prospect’s Fax field |
| %%first_name%% | Prospect’s First Name field |
| %%industry%% | Prospect’s Industry field |
| %%job_title%% | Prospect’s Job Title field |
| %%last_name%% | Prospect’s Last Name field |
| %%phone%% | Prospect’s Phone field |
| %%prospect_account.annual_revenue%% | Prospect account’s Annual Revenue field |
| %%prospect_account.billing_address_one%% | Prospect account’s Billing Address One field |
| %%prospect_account.billing_address_two%% | Prospect account’s Billing Address Two field |
| %%prospect_account.billing_city%% | Prospect account’s Billing City field |
| %%prospect_account.billing_country%% | Prospect account’s Billing Country field |
| %%prospect_account.billing_state%% | Prospect account’s Billing State field |
| %%prospect_account.billing_zip%% | Prospect account’s Billing Zip field |
| %%prospect_account.description%% | Prospect account’s Description field |
| %%prospect_account.employees%% | Prospect account’s Number of Employees field |
| %%prospect_account.fax%% | Prospect account’s Fax field |
| %%prospect_account.industry%% | Prospect account’s Industry field |
| %%prospect_account.name%% | Prospect account’s Name field |
| %%prospect_account.number%% | Prospect account’s Number field |
| %%prospect_account.ownership%% | Prospect account’s Ownership field |
| %%prospect_account.phone%% | Prospect account’s Phone field |
| %%prospect_account.rating%% | Prospect account’s Rating field |
| %%prospect_account.shipping_address_one%% | Prospect account’s Shipping Address One field |
| %%prospect_account.shipping_address_two%% | Prospect account’s Shipping Address Two field |
| %%prospect_account.shipping_city%% | Prospect account’s Shipping City field |
| %%prospect_account.shipping_country%% | Prospect account’s Shipping Country field |
| %%prospect_account.shipping_state%% | Prospect account’s Shipping State field |
| %%prospect_account.shipping_zip%% | Prospect account’s Shipping Zip field |
| %%prospect_account.sic%% | Prospect account’s SIC Code field |
| %%prospect_account.site%% | Prospect account’s Site field |
| %%prospect_account.ticker_symbol%% | Prospect account’s Ticker Symbol field |
| %%prospect_account.type%% | Prospect account’s Type field |
| %%prospect_account.website%% | Prospect account’s Website field |
| %%salutation%% | Prospect’s Salutation field |
| %%state%% | Prospect’s State field |
| %%subject%% | The email’s subject |
| %%territory%% | Prospect’s Territory field |
| %%unsubscribe%% | Link to Pardot’s Default Unsubscribe page |
| %%user_crm_id%% | Assigned user’s CRM ID |
| %%user_email%% | The sending user’s email |
| %%user_first_name%% | The sending user’s first name |
| %%user_html_signature%% | The sending user’s HTML signature |
| %%user_job_title%% | The sending user’s job title |
| %%user_last_name%% | The sending user’s last name |
| %%user_name%% | The sending user’s full name |
| %%user_phone%% | The sending user’s phone number |
| %%user_text_signature%% | The sending user’s text signature, available to edit in the user’s profile |
| %%user_url%% | Link to your company’s website from assigned user’s URL field |
| %%view_online%% | Link to view an email message in a web browser |
| %%website%% | Prospect’s Website field |
| %%years_in_business%% | Prospect’s Years In Business field |
| %%zip%% | Prospect’s Zip field |
Personalizing your B2B content goes way beyond a personalized greeting or subject line in your emails.
You can use segmented lists and lead gen forms to send specific categories of your content to people, allowing them to choose the type of content they receive. You can also build emails with dynamic content that changes the content blocks depending on which subscriber is receiving the email.
Creating fully personalized newsletters is time-consuming (and tedious, if we’re being honest).
That’s why high-volume publishers turn to tools like FeedOtter, enabling their teams to grow and scale their newsletter strategy—without sacrificing quality and ROI.
FeedOtter is a web app that automates the newsletter building process for Pardot users (although it does offer other integrations, as well), based on the tags and categories specified in your feed and our seamless integration with Pardot personalization directly in your content and your options to choose segmented lists from your Pardot instance.
Schedule a demo to see how you can increase the effectiveness of your Pardot newsletters with FeedOtter.
