Marketo does not offer native RSS email sending, which means that you’ll have to turn to a third-party tool to successfully send out (and automate) RSS-powered blog digests and roundups.
One of the top tools currently available for this purpose is FeedOtter, an all-in-one newsletter curation, building, and sending app that natively integrates with Marketo.
With this integration, you can easily use FeedOtter to set up and schedule your emails, while it passes the information directly to Marketo for sending, tracking, and analytics.
It’s a seamless integration—here’s how to set up and send an RSS email from Marketo using FeedOtter:
Before automating RSS email with Marketo you will need to find the data source; an RSS feed.
Many websites have a feed tag that can be appended to the base url. An example is any website built on WordPress where the RSS feed typically looks like this:
https://website.com/feed/
https://website.com/category/feed/
https://website.com/tag/feed/
Where “feed” is appended to the end of the website, blog, category, or tag URL.
If your website is running on Drupal or Expression Engine it might look like this:
https://website.com/blog/rss.xml
If you can’t find your RSS don’t give up! Almost every modern content management software supports RSS feed natively or with a simple plugin. Don’t be afraid to ask your website developer for help finding the RSS feed URL they will more than likely be able to supply it.
Here are some additional resources on finding RSS feeds from the FeedOtter team:
Login to your FeedOtter account and navigate to the Automated Emails module by clicking on the top navigation bar.
Click New Automated Campaign to create a new automation.
If you haven’t already, find your RSS feed URL and paste it into the appropriate box in the FeedOtter interface.
FeedOtter supports any valid RSS/Atom/XML datafeed. In addition, FeedOtter supports adding multiple RSS feeds which can be combined into 1 content stream or used to create complex multi-section newsletters automatically.
If you’re not sure if your RSS feed will work with FeedOtter we recommend using https://validator.w3.org/feed/ to ensure your feed is valid. Any valid feed will work with FeedOtter.
Here, we also told FeedOtter to display 5 posts with each email send. This means FeedOtter will only send up to 5 new posts in your email.
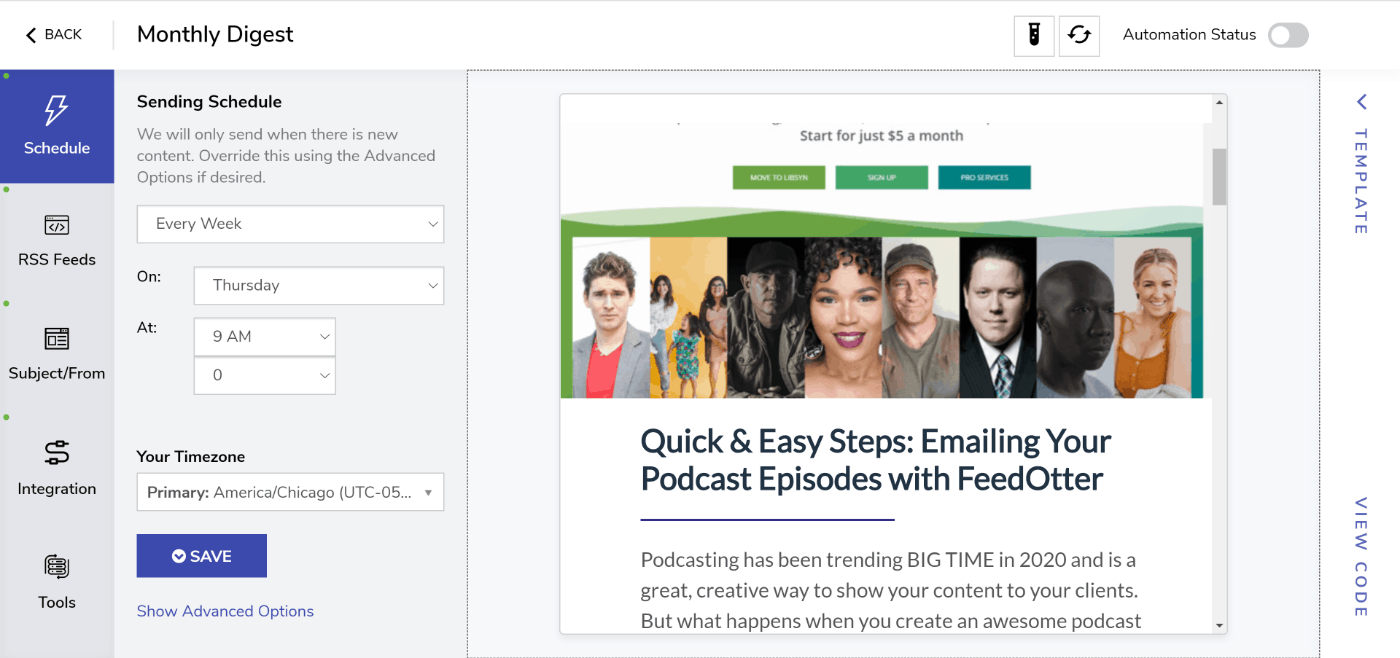
We have set up our Marketo RSS email to automatically send every week, on Thursday at 9am CT. By default, FeedOtter will only send an email when there is at least one article of new content. This behavior can be altered via the Advanced Settings area. Here you will find options to send every other week, quarterly, or to include old content.

At this point an email preview has likely appeared showing your content. We will talk about email templates and how you can use a custom email design in a moment but we need to finish setting a few basic email details first.
The last step before we dive into the Marketo connection and selecting your email’s audience is to finalize the look and feel of your Marketo RSS email.
We have included several great options for users that need a great looking template quickly as well as those who have email design and coding resources and wish to use a custom HTML email design.
When you are done with the setup its time to publish your new automated RSS email to Marketo where we will complete the last step of setting up our email audience.
Click the green Publish to Marketo button in the upper-right of your campaign window.
If you have previously setup a Marketo connection in your FeedOtter account you can select it from the dropdown. Otherwise, click the Add a Marketo Connection button.
You will be prompted to enter your Marketo REST API credentials to allow FeedOtter to create new emails in your Marketo account.
Important Note About Workspaces:
If you have the Marketo Workspaces feature you should carefully paste the exact text name of your Workspace as seen in the Marketing Activities tree view. For all other users this field should be left untouched.
Marketo connects to FeedOtter using secure REST API endpoints and permissions similar to many other Marketo integrations. If you have integrated other Marketo add-ons you will find this process familiar. We’ve created a helpful guide that will walk you through the entire process.
Read our Marketo REST API Setup Guide
After creating a successful connection to your Marketo account. FeedOtter will offer you several more options:
Customize the Automation Level
With FeedOtter you have full control over your rss emails. You can choose to have FeedOtter create and automatically send your email or create and notify you (and your team) when a new email is ready for review and sending. These options provide flexibility for testing, workflow, and hands-off automation. Many customers start with their campaign in “Create Emails” only mode for testing. When they have become familiar with FeedOtter’s automation they add the full automation functionality.
Either way you can choose the perfect level of automation while maintaining control over the actual sending process.
Specify the Marketo Tags and Channel Settings
These dropdown allow you to select your unique Tag and Channels. The number of dropdowns and options will vary based on how your Marketo account is setup. Every field is required as per your Marketo platform.
When these are filled in you are ready to Activate Campaign.
Click on the Subject/From button on the left menu. Enter in the From Name, From Email, and Subject text you wish to use for your automated emails.
Since our emails will be automated there are special features that will allow us to more easily make our subject lines interesting.
Here we use the special FeedOtter tokens listed below the subject box to insert dynamic content data including the title of the most recent post and the day of the week. The subject box also supports plain text and Marketo tokens.
The last step before we dive into the Marketo connection and selecting your email’s audience is to finalize the look and feel of your Marketo RSS email.
In the Customize tab, you can select a template from the template library, as well as import your own custom HTML design if you have a specific look and feel that you would like to use.
When using FeedOtter for Marketo your email metrics; opens, clicks, engagement will be accessed in Marketo via the familiar Email and Link Performance Reports. In addition to these metrics, you can also use the FeedOtter UTM feature, which automatically adds the correct UTM parameters to your content links. This feature is on by default but can be customized as need be.
When you are done with the setup its time to publish your new automated RSS email to Marketo where we will complete the last step of setting up our email audience.
Click the green Publish to Marketo button in the upper-right of your campaign window.
If you have previously setup a Marketo connection in your FeedOtter account you can select it from the dropdown. Otherwise, click the Add a Marketo Connection button.
You will be prompted to enter your Marketo REST API credentials to allow FeedOtter to create new emails in your Marketo account.
Important Note About Workspaces:
If you have the Marketo Workspaces feature you should carefully paste the exact text name of your Workspace as seen in the Marketing Activities tree view. For all other users this field should be left untouched.
Marketo connects to FeedOtter using secure REST API endpoints and permissions similar to many other Marketo integrations. If you have integrated other Marketo add-ons you will find this process familiar. We’ve created a helpful guide that will walk you through the entire process.
Read our Marketo REST API Setup Guide
After creating a successful connection to your Marketo account. FeedOtter will offer you several more options:
Customize the Automation Level
With FeedOtter you have full control over your rss emails. You can choose to have FeedOtter create and automatically send your email or create and notify you (and your team) when a new email is ready for review and sending. These options provide flexibility for testing, workflow, and hands-off automation. Many customers start with their campaign in “Create Emails” only mode for testing. When they have become familiar with FeedOtter’s automation they add the full automation functionality.
Either way you can choose the perfect level of automation while maintaining control over the actual sending process.
Specify the Marketo Tags and Channel Settings
These dropdown allow you to select your unique Tag and Channels. The number of dropdowns and options will vary based on how your Marketo account is setup. Every field is required as per your Marketo platform.
When these are filled in you are ready to Activate Campaign.
In the next step we will define our Audience and add Smart Campaigns to engage our subscribers further.
The FeedOtter Marketo RSS integration handles most of the setup for you. When you press the Save and Start button from the previous step FeedOtter creates several placeholder items in your Marketo account:
We create this structure to make setup quick and easy. Once they have been created you are free to move and rename them as FeedOtter will refer to them by their numerical Marketo ids.
FeedOtter works by cloning a template Email Program and Email. That email program is created automatically by the FeedOtter software and is NEVER SENT. Think of this object as a template from which all automated email sends will derive from.
This is where we setup the Smart List rules that will select the audience/recipients of your automated email.
Note: These steps are required if you selected automate future runs in the previous steps. Otherwise, they are optional.
These are both one-time setups. FeedOtter will use these settings for all subsequent automated sends.
At this point our automated email is 100% up and running integrated with Marketo. Let’s examine a sample automation flow:
Sample Automation Flow:
A Quick Note About Unsubscribe Handling
Since all emails are sent by Marketo unsubscribes are handled and tracked by Marketo. All FeedOtter rss email templates use the default Marketo {{system.unsubscribe_link}} merge token. If you wish to change this it should be done in your FeedOtter email template.
You can easily report on opens, clicks, and engagement for your automated email campaign using Marketo’s built in email performance and link performance reports.
The resulting report will show you line-by-line each email send an the engagement metrics for each.
A great way to extend your automated rss emails with Marketo is to use the awesome Smart Campaign functionality of Marketo to watch and engage as your automated emails are sent.
Our two favorite Smart Campaigns are:
#1 Watch all automated rss emails and email subscriber who have not clicked content in the last 60 days
We will then trigger an email send to these subscribers asking if they would like to remain on our list.
#2 Watch our emails for subscribers that voraciously consume our content, clicking on more than 10 posts in a 30 day period
We send these folks an email asking them if they would like to collaborate on an upcoming content piece. This could be an offer to write a guest blog post or sometimes we will interview the reader about their content marketing and current goals either way it is a great way to engage people that love your content.
One of the most overlooked benefits of having an automated Marketo rss email is the increase in website traffic it can provide. Many Marketo users see a 5-15% increase in blog and website traffic just from a weekly automated rss email.
If you turned on the UTM code feature earlier in this tutorial, you can monitor the tracking in Google Analytics to view website traffic as it related to your RSS emailing.
